I don’t like CSS. Plain and simple. It makes the World go round on the web, yet the language is restrictive and hard to manage. It’s time to spruce up the language and make it more helpful by using dynamic CSS with the help of LESS.
Let me illustrate my point with an example right away. Instead of using #FF9F94 to get a dark peach color, wouldn’t it be easier to store that color value inside a variable and just use that variable? If you want to recolor your webpage you just change the value of the variable in one place and that’s that.
In other words: it would be awfully nice if we could use some programming and logic inside CSS to make it a more powerful tool. The good news is that with the help of LESS we can!
What Is LESS?
LESS is a superset of CSS. This means that all CSS code is valid LESS code but there are additional elements in LESS which would not be valid in CSS. This is great because your existing CSS is already valid LESS code, minimizing the learning curve to using LESS.
LESS adds much needed dynamic properties to CSS. It introduces variables, operations, function-like elements, even Javascript into the mix. It will make your life hassle free by enabling you to write stylesheets with a modular mindset.
How To Use LESS
There are two ways to use LESS. You can create a LESS file and convert it on-demand using a Javascript file or you can pre-compile it and use the resulting CSS file. If you just got scared because you saw the word “compile” (I always used to) please don’t go anywhere, it is extremely easy.
Using The LESS Javascript File
First of all head down to the LESS website and grab the Javascript file. Once you have it, all you need to do is link it to your page like any other Javascript file.
<script src="less.js" type="text/javascript"></script>
Next, create a file with the .less extension and link it to your page with the code below:
<link rel="stylesheet/less" type="text/css" href="style.less">
Make sure that you link your LESS file before the Javascript file.
Once you have this setup you can paste your existing CSS code into the LESS file or just write a few new rules – it should work just like plain ol’ CSS.
Compiling The LESS File
While this is a bit more tedious, in some scenarios this is preferred. LESS works by taking all the LESS code you write and converting it to CSS on the fly. Instead of doing this on demand we can convert our LESS file, save the CSS output and use that instead of doing the on-demand conversion on each page load.
If you’re a Mac user you can use LESS.app, a small application which can detect all your LESS files automatically and whenever you save them it will convert them to a CSS file with the same name. This allows you to keep on linking to your CSS file on your pages while still utilizing the potential of LESS.
If you’re on Windows you can use Winless which works in much the same way.
If you prefer command-line tools you can use the Node Package Manager (NPM) to install LESS. Some documentation is available on the LESS website. You can also grab the code directly from the Github repository.
Harnessing The Power Of LESS
Finally, let’s get started with the fun bit – writing LESS code. As you will see it is very easy to read and understand; it uses the same syntax style as CSS does so it should all be familiar to you.
Variables
Variables in LESS work exactly like they do in PHP or most other programming languages. You can use them to store a value and then use the variable instead of the value itself whenever you need it.
@header-font: Georgia;
h1, h2, h3, h4 {
	font-family: @header-font;
}
.large {
	font-family:@header-font;
}
In the example above we defined the @header-font variable and assigned the value “Georgia” to it. We can now use this variable whenever we want to use the Georgia font. If we decide we’d rather go with Trebuchet MS as our heading font we don’t need to go through our whole file, we just change the value of the variable.
I find great use for variables when defining colors for a website. In the good old days (which weren’t that long ago) I used to do something like this:
/*
 Colors for my Website
 	#ff9900 - Orange - used for links and highlighted items
    #cccccc - Light Gray - used for borders
    #333333 - Dark Black - Used for dark backgrounds and heading text color
    #454545 - Mid Black - Used for general text color
*/
body {
	background: #333333;
	color: #454545;
}
a {
	color:#ff9900;
}
h1, h2, h3, h4, h5, h6 {
	color: #333333;
}
There is nothing wrong with documenting your colors like this, it is good practice, the problem is that since it has nothing to do with the functionality of your stylesheet it has no other use than documentation itself. If you decide on a different color after line 2,000 and then change your mind at line 3,567 it will be extremely difficult to ensure the right colors are used and the documentation is correct as well.
With LESS we can modify our workflow and actually use our “documentation” instead of it remaining a passive bystander in the process.
/* Colors for my Website */
@color-orange: #ff9900;
@color-gray_light: #cccccc;
@color-black_dark: #333333;
@color-black_medium: #454545;

body {
	background: @color-black_dark;
	color: @color-black_medium;
}
a {
	color:@color-orange;
}
h1, h2, h3, h4, h5, h6 {
	color: @color-black_dark;
}
Variable Scope
The scope of a variable refers to the places where it is available. If you define a variable at the very start of your LESS file it will be available to any code you write after it.
You can also define a variable inside a CSS rule. In this case the variable is not available outside of this ruleset; it can only be used locally.
a {
	@color: #ff9900;
	color:@color;
}
button {
	background: @color;
}
In the example above the LESS file will not be converted since there is an error, @color is not defined for use inside the button element. If a variable is defined outside of an element and inside of an element the local definition takes presidence.
@color: #222222;
a {
	@color: #ffffff;
	color:@color;
}
button {
	background: @color;
}
In the example above the link will be colored white, the button will have a black background.
Variable Variables
If you’re used to coding in PHP you know that you can define a variable name with another variable.
@color-chirstmas_red: #941f1f;
@name-of-color: "color-chirstmas_red";
color: @@name-of-color;
Contants VS Variables
An important thing to note is that contrary to what you just read, variables in LESS are more like constants. This means that they can only be defined once – as opposed to variables which can be defined as many times as you’d like.
Operations
You can achieve extremely granular and accurate control with the help of operations in LESS. The idea behind this is simple:
.button{
	@unit: 3px;
	border:@unit solid #ddd;
	padding: @unit * 3;
	margin: @unit * 2;
}
The above code defines a the variable @unit as 3px. It then goes on to define the border as having exactly that width, the padding to have three times that width and the margin as having twice that width.
Operations can be multiplication, division, addition and subtraction. To create a box with a border that is increasingly wide as you move clockwise along its perimeter you can use the following code.
.box{
	@base_unit: 1px;
	border: @base_unit @base_unit + 1 @base_unit + 2 @base_unit + 3
}
Color Management
My favorite features of LESS have to do with color management. You can use operations to mix colors and there are some specific color functions.
Color Operations
If you want to change the value of a color you can do so by subtracting or adding another color to it.
@color: #941f1f;
button {
	background: #941f1f + #222222;
	border: #941f1f - #111111;
}
The above operation in the background will increase each HEX value by 2. This results in “B64141″ which is a lighter variation of the original color. The operation in the border will decrease each HEX value by 1 resulting in a darker color: “830E0E”.
In practice there are quite a few cases where we start out with a base color and need a slightly darkened or lightened version.
@color-button: #d24444;
input.submit {
	color:#fff;
	background:@color-button;
	border:1px solid @color-button - #222;
	padding:5px 12px;
}
This creates a red button which has a slightly darker border. This is something you may need very often and not having to define the border color separately is great help.
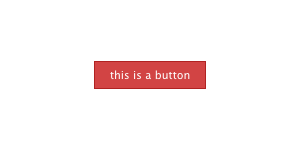
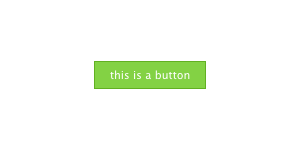
The power of variables is even more obvious here. If you want to recolor the website and change the @color-button value to a green color not only does the background of the button change but the border also changes and becomes a deeper version of the green color.
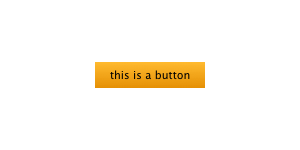
Another great use of this is creating gradients. I typically choose a mid-point color and define the gradient from there. I make the start slightly lighter and the end slightly darker. This results in a nice transition, something like this:
@color: #faa51a;
.button {
	background: -webkit-gradient(linear, left top, left bottom, from(@color + #151515), to(@color - #151515));
	background: -moz-linear-gradient(top,  @color + #151515,  @color - #151515);
}
Color Functions
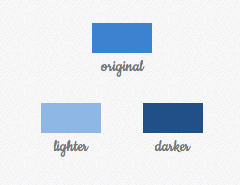
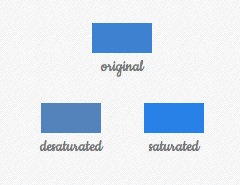
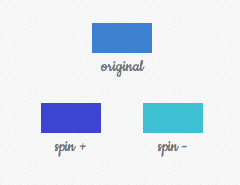
There is a lot more that you can do with colors; LESS allows you to manipulate them on a channel level. You can lighten, darken, saturate, desaturate, fade in, fade out and spin colors. Take a look at the following examples and images to see what each of these do.
@color: #3d82d1;
.left_box {
	background:lighten(@color, 20%);
}
.right_box {
	background:darken(@color, 20%);
}
@color: #3d82d1;.left_box {
	background: desaturate(@color, 18%);
}
.middle_box {
	background: @color;
}
.right_box {
	background: saturate(@color, 18%);
}
@color: #3d82d1;.left_box {
	background: spin(@color, 25%);
}
.middle_box {
	background: @color;
}
.right_box {
	background: spin(@color, -25%);
}
Extracting Color Information
Each color in LESS is converted to HSL (hue, saturation, lightness) to enable you to manage them on the channel level. Due to this you can manipulate colors in a more sensible way and also access the channel information of a color directly:
@color = #167e8a;
hue(@color);
saturation(@color);
lightness(@color);
This might seem like micromanagement – why do we need this information when we can just enter a HEX value? If you’re like most people HEX values don’t come naturally to you. HEX values map the RGB spectrum. the first two characters controlling the amount of red, the next two the amount of green and the last two the amount of blue.
It is fairly obvious that #ff0000 is red since this would be RGB(255,0,0). Tons of red, no green and no blue. However, if you just see #1f6b2d it is hard to decypher that this is a deep green. With a HSL scale the hue controls what you would call color, the rest just sets the tone (this is not exactly right, but for all intents and purposes it is).
With that in mind if you found a nice magenta-purple color like #e147d4 you can find a different color with the exact same hue very easily. Say you want to create a creamier, more pastel version of #e147d4, here’s what you can do:
@color: #e147d4;
@new_color: hsl(hue(@color), 35%, 77%);
This new color will have the same hue but a different saturation and brightness. The result will be #c480bf which is quite difficult to arrive to from #e147d4 if you’re just thinking in HEX.
Combining Funtions
LESS allows you to use functions inside functions, so if you want to desaturate and spin a color you can do that in a jiffy like so:
@color: #c480bd;
.class {
	background-color: desaturate(spin(@color, 18), 12%);}
Nesting
When writing CSS you use a cascading style. To change the margin of paragraphs inside blog posts only you could use the following code.
article.post p{
	margin: 0 0 12px 0;
}
There is nothing wrong with this approach but when you also want to change the links, blockquotes, headings, pre-formatted text and so on inside this same element you would need to prefix each with “article.post”. This makes our code more tedious to write and harder to read.
In LESS we can nest these rules which gives a shorter and more logical version of our stylesheet. Observe.
article.post {
	p{
		margin: 0 0 12px 0;
	}
	a {
		color: red;
	}
	a:hover {
		color: blue;
	}
	img {
		float:left;
	}
}
See what I did there? The tabbing is not necessary by the way but it makes it much more legible. You can nest rules as much as you like which saves you a lot of worrying later on. Have you ever wanted to change the padding of something but were scarred because you didn’t know exactly what elements it might affect? By using nesting you can take a lot of the guesswork out of your CSS.
a {
	color:red;
}
p {
	margin:0px;
}
article {
	a {
		color: green;
	}
	p {
		color: #555;
		a {
			color:blue;
		}
	}
}
Mixins
Mixins in LESS is the feature which will save you the most typing. have you ever created a rounded border where only the top left and right corners were rounded?
.tab {
	-webkit-border-top-left-radius: 6px;
	-webkit-border-top-right-radius: 6px;
	-moz-border-radius-topleft: 6px;
	-moz-border-radius-topright: 6px;
	border-top-left-radius: 6px;
	border-top-right-radius: 6px;
}
Uggh… Each and every time… With LESS you can change all that by creating a mixin. Mixins are reusable elements which you can add as a rule to any other element. The beauty of them is that there is no additional syntax to learn.
.rounded_top {
	-webkit-border-top-left-radius: 6px;
	-webkit-border-top-right-radius: 6px;
	-moz-border-radius-topleft: 6px;
	-moz-border-radius-topright: 6px;
	border-top-left-radius: 6px;
	border-top-right-radius: 6px;
}
.tab {
	background: #333;
	color:#fff;
	.rounded_top;
}
.submit {
	.rounded_top;
}
In the above code we defined the .rounded_top element to have rounded corners on top. When we add this to any other element as a mixin (see .tab) we are basically importing the rules we created for it. Due to the syntax of mixins you can use any old element as a mixin.
.rounded_top {
	-webkit-border-top-left-radius: 6px;
	-webkit-border-top-right-radius: 6px;
	-moz-border-radius-topleft: 6px;
	-moz-border-radius-topright: 6px;
	border-top-left-radius: 6px;
	border-top-right-radius: 6px;
}
.tab {
	background: #333;
	color:#fff;
	.rounded_top;
}
.submit {
	.tab;
	background: red;
}
The CSS rules for the .submit element will now call for rounded corners on top, a color of white and a background of red (the orinal #333 is
overwritten).
Parametric Mixins
Parametric mixins sound extremely complex but they solve a problem in a very simple way. In the examples above you saw how we could define an element to have a 6px radius on its top corners. How about if we want an element to have a 3px radius? Should we declare separate mixins for all pixel values? The answer is of course not, we should use parametric mixins!
These resemble functions because you not only create a mixin but you can pass values to it when you call it. Let’s rewrite the border radius example to take a look at how it’s done.
.rounded_top(@radius) {
	-webkit-border-top-left-radius: @radius;
	-webkit-border-top-right-radius: @radius;
	-moz-border-radius-topleft: @radius;
	-moz-border-radius-topright: @radius;
	border-top-left-radius: @radius;
	border-top-right-radius: @radius;
}
.tab {
	background: #333;
	color:#fff;
	.rounded_top(6px);
}
.submit {
	.rounded_top(3px);
}
The above code will give our tab element a 6px radius while our submit element will receive a radius of 3px.
Default Values
If you usually use the same border radius but in some cases you need a different one you can give the mixin a default value.
.rounded_top(@radius:6px) {
	-webkit-border-top-left-radius: @radius;
	-webkit-border-top-right-radius: @radius;
	-moz-border-radius-topleft: @radius;
	-moz-border-radius-topright: @radius;
	border-top-left-radius: @radius;
	border-top-right-radius: @radius;
}
.tab {
	background: #333;
	color:#fff;
	.rounded_top;
}

.submit {
	.rounded_top(3px);
}
In this example the tab element will receive the default 6px border radius but the submit element will receive the 3px one as needed.
Multiple Parameters
You can also use multiple parameters to define more complex mixins.
.radius(@radius:6px) {
	-webkit-border-radius: @radius;
	-moz-border-radius: @radius;
	border-radius: @radius;
}
.button(@radius:3px, @background: #e7ba64, @padding: 4px) {
	.radius(@radius);
	background:@background;
	border: 1px solid @background - #222;
	padding: @padding;
}
.read_more {
	.button(0px);
}
Whenever you create an element with the .read_more class using the example above it will format it with a 4px padding, the background color of #e7ba64 and
with a 0px border radius.
Using All Arguments At Once
One more option you have when using arguments is to use the whole lot all at once. Shorthand properties in CSS have multiple values written one after the other.
div {
	border:1px solid #bbb;
}
You could use a function to give all required elements a gray border like so:
.gray_border(@width: 1px, @type: solid, @color: #bbb){
	border:@arguments;
}
div {
	.gray_border(2px, dashed);
}
The @arguments is a special keyword, it will output all parameters one after the other in the order given. In the above case the CSS code resulting from
your LESS file would be:
div {
	border:2px dashed #bbb;
}
Parametric Mixins Without Paremeters
It is also possible to use parametric mixins without actually using any parameters. This is used when you do not** want the mixin to show up in your CSS code but you **do want its rules applied to the elements it is used in.
.alert {
	background: red;
	color: white;
	padding:5px 12px;
}
.error_message {
	.alert;
	margin: 0 0 12px 0;
}
The CSS output of the above would be the following:
.alert {
	background: red;
	color: white;
	padding:5px 12px;
}
.error_message {
	background: red;
	color: white;
	padding:5px 12px;
	margin: 0 0 12px 0;
}
If you use an empty parameter set you can hide the .alert class.
.alert() {
	background: red;
	color: white;
	padding:5px 12px;
}
.error_message {
	.alert;
	margin: 0 0 12px 0;
}
The CSS produced from the above LESS code would be:
.error_message {
	background: red;
	color: white;
	padding:5px 12px;
	margin: 0 0 12px 0;
}
This is primarily useful for cutting down the size of your CSS file. If the .alert class is never used directly on any element there is no reason to have it in the resulting stylesheet as long as its properties are passed along to the needed elements as mixins.
Namespaces
Namespaces in programming languages are typically used to group packages of functionality together. We can achieve the same in LESS by bundling our code using mixins.
#my_framework {
	p {
		margin: 12px 0;
	}
	a {
		color:blue;
		text-decoration: none;
	}
	.submit {
		background: red;
		color: white;
		padding:5px 12px;
	}
}
When starting work on a new website based on your framework you can add this #my_framework bundle and use it without messing up any other styles you might already have or want to add in the future.
.submit_button {
	#my_framework > .submit;
}
This is also a great way to enable quick theme changing and modification. If you develop a number of themes for your company to use as templates on demand you can include all of them as bundles in the same LESS file and use use the one you need.
#fw_1 {
	p {
		margin: 12px 0;
	}
	a {
		color:blue;
		text-decoration: none;
	}
	.submit {
		background: red;
		color: white;
		padding:5px 12px;
	}
}

#fw_2 {
	p {
		margin: 8px 0;
	}
	a {
		color:red;
		text-decoration: underline;
	}
	.submit {
		background: blue;
		color: white;
		padding:8px 20px;
	}
}
.submit_button {
	#fw_2 > .submit;
}
String Interpolation
String interpolation is just a fancy word which means that arbitrary strings can be stored in variables and then used inside property values.
@url: "http://mycompany.com/assets/";background-image: url("@{url}/sprite.png");
The above can be immensely helpful when creating centralized frameworks and making sure that resources are pulled from the correct place.
Escaping
In some cases you will need to use properties or values which are not valid CSS (IE rules anybody?). You may have noticed in our gradient example that I did not cater for Internet Explorer users.
If you want to create a gradient in IE you will need to do something like this:
filter: progid:DXImageTransform.Microsoft.gradient(startColorstr='#666666', endColorstr='#444444');
The above is not valid CSS so the LESS processing will not be able to complete. In this case you can escape this value which will make LESS skip it and move on. The result of this is that it will be output to your CSS without any processing.
.button {
	background: -webkit-gradient(linear, left top, left bottom, from(#666666), to(#444444));
	background: -moz-linear-gradient(top,  #666666,  @color - #444444);
	filter:  ~"progid:DXImageTransform.Microsoft.gradient(startColorstr='#666666', endColorstr='#444444')";}
All you need to do is encase the section in quotes and tack a tilde character in front of it. This section will not go through the LESS processor so will not throw it off.
Importing
Just like with normal CSS you can import files. LESS lets you import both CSS and LESS files with the following syntax:
@import "reset.min.css";
@import "framework.less";
@import "widgets";
The first import is pretty obvious. This will import the CSS rules defined in reset.min.css without running them through the LESS parser.
The second import will pull the contents of framework.less and process them just like any other LESS rules.
The third import is essentially the same as the second. If an extension is not given LESS presumes it to be a LESS file.
Comments
As expected, multi-line comments are available in LESS in the same way that they are used in CSS. In addition LESS allows for single line comments to be used just like in PHP; by using a double forward slash.
/*
	This is my main LESS file.
	It governs how most of the site looks.
/*
body {
	padding:0px; // This resets the body padding
}
What’s Missing?
While LESS is awesome you will find some shortcomings when you start using it although these are not very bothersome. One feature I’d love to see is pre-pre-processing (I agree, this makes no sense).
Remember how lines can be escaped so that they don’t run through the parser? Due to the current way LESS handles things we can’t really use gradients with variable color names.
filter: ~"progid:DXImageTransform.Microsoft.gradient(startColorstr='#faa51a', endColorstr='#f47a20')";
The above works just fine but the colors have to be hard coded in. Since the line is escaped, variables aren’t processed. It would be nice to have an option where the indicated string is escaped but variables are processed before the output is sent to the CSS file.
Another feature I would like to see implemented is variable naming of selectors and other elements, not just values. When we were looking at namespaces we used something like the following to add rules.
a {
	#my_framework > .link
}
It would be great if we could do this something like this instead:
@framework: "#my_framework";
a {
	@{framework} > .link
}
This would enable me to add all my frameworks to a single LESS file and then choose one by simply changing the value of the variable.
There are very few bugs and a couple of other shortcomings but overall LESS is very usable and very stable.
Conclusion
As with all new technology and methodology there is an urge to over-use. Remember reflective logos at the beginning of the Web 2.0 era?
You don’t have to nest all your rules, you don’t have to create variables for everything and mixins for a simple border width.
If you don’t know when not to use the awesome power of LESS your LESS code will be come just as unreadable as regular CSS and just as hard to maintain. The trick is to know when to utilize the given functions and methods and when regular old CSS is best.
In addition I suggest not using LESS in production. There is nothing wrong with it but there’s simply no reason to load a LESS file and a script to process it. Apparently the script is very quick but I’m sure it isn’t quicker than not having it there. I usually develop all my websites with LESS and when I’m happy I just grab the output, minify it and use it in a regular CSS file.