In the first two parts of this series I introduced you to the Shopify ecommerce platform, explained its key concepts, discussed how themes are constructed and then moved onto an in-depth look at Liquid - the Shopify templating language.
In this final part we will look at how a little deeper knowledge of Liquid will enable you to make your themes even more flexible enabling you to deliver rich and imaginative store designs.
Let's begin by looking at how we can use "alternate layouts" to great effect.
Alternate Layouts
One of the most powerful features of Liquid is the layout file which we looked at in part one. I often describe a layout file as a "master template". Typically this file will include our HTML declarations, branding, navigation and footer - essentially all the common elements of our site that we want to appear on every page.
All rendered pages in a Shopify theme, unless stated, will be based on this master template. By default this is the theme.liquid file which resides in the layouts folder. Our micro templates, located in the templates folder, will be rendered at the point Shopify encounters the {{ content_for_layout }} Liquid placeholder in our layout file.
To jog your memory here's a very basic layout file example:
<html><head>
{{ content_for_header }}<title>{{ shop.name }} - {{ page_title }}</title><meta http-equiv="Content-Type" content="text/html; charset=utf-8"/>
{{ "screen.css" | asset_url | stylesheet_tag }}</head><body>
{{ content_for_layout }}</body></html>
As mentioned in part one, a layout file in a Shopify theme must include two Liquid output tags, {{ content_for_header }} and {{ content_for_layout }}. The first one is used by Shopify to add in code for analytics and to provide quick access to your shop's admin area. The second, {{ content_for_layout }}, will be replaced by the relevant template from our templates folder, e.g. the product.liquid template will be injected when we are viewing a product detail page.
Layouts are a great feature and help us keep themes nice and DRY. However, there will be times that the elements of your default layout file need to change. Perhaps you want to produce a splash page that doesn't require the "normal" branding and navigation. It's possible you may be able to achieve the desired results with CSS, but more likely you will want to produce different markup. Here's where alternative layouts come into play.
Creating an alternative layout is very straightforward. The first thing to do is create a new file and give it a relevant name and the .liquid extension. The file name is up to you. What's important is that you save it in the layouts folder in your theme directory. In this file you can place any HTML you need (i.e. HTML declarations, CSS, JS links etc) along with the two placeholders discussed above.
In order to use this layout file, and effectively override the default theme.liquid layout file, we use the following Liquid syntax in any of the micro templates:
{% layout "alternative" %}Note: you don't need to include the .liquid extension. Now when the relevant micro template is processed by Shopify it will be rendered with alternative.liquid as its layout file.
Product-Specific Templates
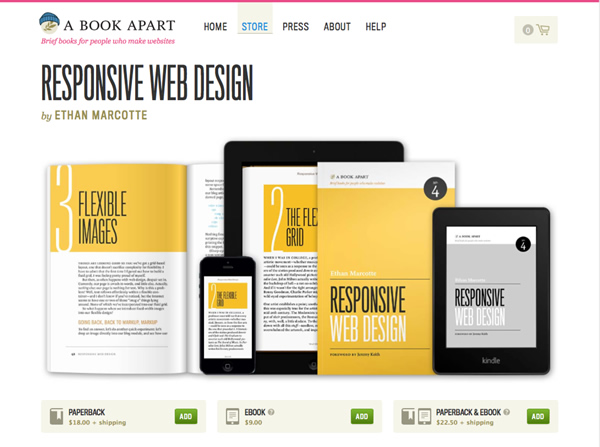
In the same way that we can dictate specific layouts to be applied to our micro templates we can use Liquid logic to render different product templates. There are a number of ways to achieve this in Liquid - my preferred method is to make use of product handles. If you have ever used WordPress you can think of a product handle in the same way as a slug. Here's a typical product URL from the A Book Apart web site to demonstrate:
http://www.abookapart.com/products/responsive-web-design
In this example the product handle is responsive-web-design– the last element of the URL. Product handles are created automatically for you when you add a product in the Shopify admin and are based on the name you enter; uppercase characters are replaced with lowercase and spaces with dashes. You can of course override them if you need to.
By default, every time Shopify renders a product detail page it will use the product.liquid micro template. Let's say we want to serve a different product page just for Ethan's book to really highlight it. In order to do this we need to make a couple of changes to the product.liquid template.
As the product.liquid template has access to all the data relating to the currently viewed product we can ask the following question using a Liquid if statement:
{% if product.handle == "responsive-web-design" %}
{% include "responsive-web-design" %}
{% else %}
[Normal HTML code for product.liquid]
{% endif %}
By adding in the if statement, which we looked at in part two of this series, we are able to control which markup is rendered. Simply put, if the product.handle is equal to "responsive-web-design" we include the file called responsive-web-design.liquid. However, if it isn't, we simply render the code that we already have in our product.liquid template.
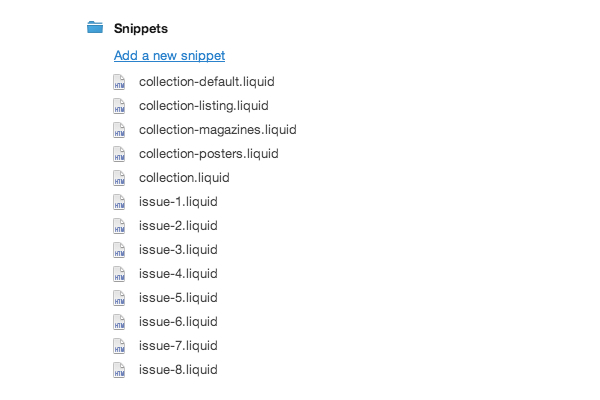
The Power of Snippets
This example introduces us to Liquid snippets. Snippets live in the aptly named snippets folder and are referenced without the .liquid extension when using the Liquid tag {% include %}.
As the name suggests, using {% include %} will literally include a piece of code in your micro template or layout file. In the example above the file would contain the alternative markup required to showcase Ethan's book including all necessary Liquid code to pull the data about the product into the template.
Of course you could specify that this particular template be used for another book in addition to Ethan's. Here's one way of achieving that:
{% if product.handle == "responsive-web-design" OR product.handle == "design-is-a-job" %}
{% include "responsive-web-design" %}
{% else %}
[Normal HTML code for product.liquid]
{% endif %}
In this case you may want to rename your snippet to something more appropriate, i.e. product-showcase.liquid.
It's worth noting that you are unable to nest folders within your snippets directory. Consequently I tend to prefix my files with their function:
product-responsive-web-design.liquidproduct-showcase.liquidcollections-books.liquid
Using this naming convention makes finding snippets much easier, especially as your use of them increases.
When to Use Snippets
I tend use snippets in two different ways. Firstly to separate code into manageable chunks, and secondly for elements of a page that I need to reuse, such as a pagination block.
As a general rule of thumb here's how I decide on where to add code:
- Appears on every page - layout file
- Appears on more than one page - snippet file
- Appears on one page - micro template
Micro Templates as Controllers
Another trick I have employed to great effect is to treat a micro template as a view controller - an idea I have taken from many of the MVC frameworks I have used. This might be a new concept for you so let's have a look at it in more detail.
In the above examples we are using Liquid logic to check for a particular product handle in the product.liquid micro template. If the answer to our if statement is true we include a snippet, otherwise Shopify renders the HTML block contained between the {% else %} and {% endif %} tags.
To some this might seem a bit messy and can, over time, get hard to read, especially if your default product.liquid markup grows. To make it easier to manage we can simply take our default markup out of the product.liquid template and create a snippet for it - I tend to call this product-default.liquid.
Following this approach our product.liquid file could be refactored to the following:
{% if product.handle == "responsive-web-design" %}
{% include "product-responsive-web-design" %}
{% else %}
{% include "product-default" %}
{% endif %}
Of course, as your needs grow this file could grow to incorporate other checks and relevant files included depending on the results. The options are limitless.
It's worth remembering that it's not just products that have handles in Shopify, collections and pages also do. Using the same approach for collections we could do the following in our collections.liquid template:
{% if collection.handle == "css" %}
{% include "collection-css" %}
{% else %}
{% include "collection-default" %}
{% endif %}
Using case Instead of if elsif else
This method works very well if we just want to check for one particular handle, be it a product or collection, but what if we want to extend that to multiple products or collections?
We have two possible approaches, the first is by extending our if statement by using elsif. Here's an example:
{% if product.handle == "responsive-web-design" %}
{% include "product-responsive-web-design" %}
{% elsif product.handle == "design-is-a-job" %}
{% include "product-design-is-a-job" %}
{% else %}
{% include "product-default" %}
{% endif %}
This example checks for two product handles in turn and only if neither are true will it render the product-default.liquid snippet.
It is possible to use multiple elsif statements in Liquid but it can get a bit verbose. An alternative, and I think neater approach is to use case. Here's the above example refactored:
{% case product.handle %}
{% when "responsive-web-design" %}
{% include "product-responsive-web-design" %}
{% when "design-is-a-job" %}
{% include "product-design-is-a-job" %}
{% else %}
{% include "product-default" %}
{% endcase %}
We can also do a more fuzzy comparison by using the Liquid operator contains. Let's say we want any product that has the word responsive in its handle to use a different snippet. Here's how we could approach it using a simple Liquid if statement:
{% if product.handle contains "responsive" %}
{% include "product-responsive" %}
{% else %}
{% include "product-default" %}
{% endif %}
Using this method would mean we wouldn't have to edit our template to add in a new elsif or case for further books that contain "responsive" in their title.
These approaches can also be used within the micro templates in your theme. For example you could use it to show and hide elements programatically. Examples of this might be sale badges, special offers and related products.
Creating Useful CSS Hooks
Handles can also come in very handy when working with CSS and JavaScript. Many of us use the body class for CSS and JavaScript hooks and just like in WordPress it's pretty easy to add a number of useful classes to our body element in Shopify.
Here are a few ideas:
Add the currently rendered template name to the body class:
<body class="{{ template | handleize }}">Note we are using the handleize filter to sanitise our output. Some examples of this in action are:
<body class="home"><body class="product"><body class="collection">
Building on this we may wish to add the current product handle to our body class as well. To keep things neat and tidy we can use an if statement to conditionally add the product handle only when we are viewing a product:
<body class="{{ template | handleize }}{% if template == "product" %} {{ product.handle }}{% endif %}">Note how I include the space before the {{ product.handle }} output tag.
Some themes also add the current page title to the body element in the form of an id, building on the above our code would now look as follows:
<body id="{{ page_title | handleize }}" class={{ template | handleize }}{% if template == "product" %} {{ product.handle }}{% endif %}">For good measure we could even add in a check for collections and add that too:
<body id="{{ page_title | handleize }}" class={{ template | handleize }}{% if template == "product" %} {{ product.handle }}{% endif %}{% if template == "collection" %} {{ collection.handle }}{% endif %}">It's pretty easy to adjust this logic for your own purposes.
So far we have looked at how we can use Liquid to go beyond outputting data and controlling the flow of our templates. Now let's turn to have a look at another great feature of Shopify - theme settings.
Theme Settings
Theme settings allow theme developers to provide an easy way for any user to customise the look and feel of their store without having to alter any HTML or CSS. This makes themes very flexible - a plus if you ever consider selling a theme via the Shopify theme store or Themeforest.
In order to expose theme settings in our store admin we must create a file called settings.html and save it in the config folder. Please note the extension, this is the only file with a .html extension in your Shopify theme.
There are infinite uses for theme settings, but a common one is to change the background colour of the whole site. Here's a code example which we can discuss:
<fieldset><p><legend>Colors Settings</legend></p><table><tbody><tr><th><label for="bg_color">Background (example)</label></th><td><input id="bg_color" name="bg_color" class="color" value=""#FFF"" /></td></tr></tbody></table></fieldset>
The most important element here is the input. Note that we have given it an id and name attribute of bg_color and a class of color. This class is important; when we view our theme settings in the admin Shopify will render a handy colour picker in place of our input.
You will also notice that I have set a value on our input of #FFF. If we choose to use our theme settings in our CSS file this is the value that will become the default. Without this default an empty value will be used. This is one gotcha I see a lot!
Theme settings are globally available to us, meaning we can output their value in all of our templates and layout files. This includes our CSS and JavaScript files. To reference a setting, in this case our background colour we use the following syntax:
{{ settings.bg_color }}Note that we are using the id of the input to pull out its value. For this reason the id of each input must be unique.
Using Theme Settings
In order to use theme settings in our CSS file we need to append .liquid to our CSS file. If our file is called screen.css we simply change it to screen.css.liquid.
Once we have done that we can do the following in our CSS file:
body {
	background: {{ settings.bg_color }};
}
When Shopify serves our CSS file it will replace our Liquid output tags with the value specified in the theme settings in the Shopify admin. Hopefully this example highlights the need for defaulting the value!
As well as entering text and numerical values in theme settings you can upload files, record boolean values with checkboxes and offer select drop downs to pick a value from a list.
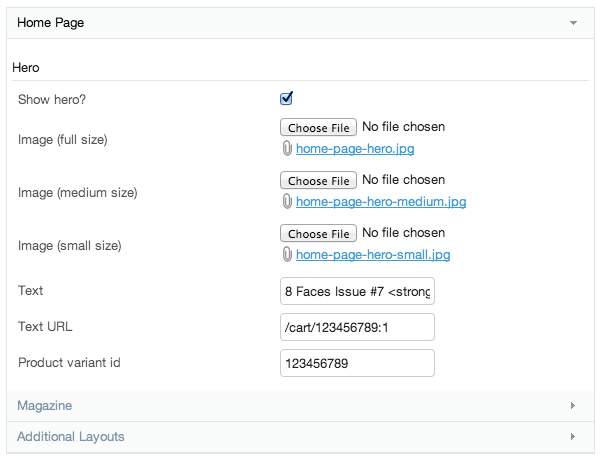
<fieldset><p><legend>Home Page</legend></p><h3>Hero</h3><table><tbody><tr><td><label for="show_hero">Show hero?</label></td><td><input type="checkbox" id="show_hero" name="show_hero" /></td></tr></tbody></table></fieldset>
The above example is taken from the 8 Faces web site I worked on in 2013. We use this setting to control logic on the home page, here's how:
{% if settings.show_hero == true %}
[Relevant hero banner code snippet]
{% endif %}
Adding files is slightly more complicated so let's have a quick look at it. The markup is however pretty straightforward:
<fieldset><legend>Home Page</legend><h3>Hero</h3><table><tr><td><label for="home_hero_image">Image (full size)</label></td><td><input type="file" name="home-page-hero.jpg" id="home_hero_image" /></td></tr></table></fieldset>
There are a couple of things to note here, firstly the name attribute which in our example is home-page-hero.jpg. Regardless of the name of the file you upload, it will be renamed to home-page-hero.jpg.
The second thing worth knowing is the extension, in our case .jpg. Regardless of the file type you upload Shopify will attempt to convert it to the specified type. If it can't, it will report an error. Finally, unlike product images, file uploads will always be saved to the theme's asset folder.
Here's how we can render our home page hero image in our template:
<img src="{{ 'home-page-hero.jpg' | asset_url }}">Here we use the asset_url filter to add in the full path to the image on the Shopify CDN. If you are unfamiliar with this filter you can read more about it in part two of this series.
I strongly recommend you download a free theme or two from the Shopify theme store and dissect the theme settings template, as they are a great building block for your own theme development.
Shopify Toolkit
Whilst it's fair to say that all you really need to start developing themes is a text editor and a Shopify partner account there are a few goodies out there that are well worth considering.
If you have been following the series you will perhaps have signed up for a free Shopify partner account. One thing I always recommend to do is to set up the "bogus gateway" in your development stores. You will find this in the settings tab under checkout in the Shopify admin. Enabling this will allow you to showcase a full transaction and will generate all the associated email notifications that are generated. It's worth remembering that you can also use all of these Liquid techniques in your notification emails to great effect.
Another very useful utility is the Shopify Desktop Theme Editor for Mac. Once installed it will seamlessly sync your file changes to your development, or live, shop. Also, if you are using Mac, Windows or Linux you can also install the Shopify theme Gem command line tool to sync your local files to your development store.
Finally, if you are a TextMate user or a fan of SublimeText you may wish to install a copy of the Liquid extension which handles syntax highlighting for Liquid.
Theme Inspiration
The Shopify theme store is full of free themes that you can download and learn from. However when it comes to starting your own theme you might prefer something more stripped back like my own boilerplate available on GitHub.
Resources
Finally, here are a few choice resources to help you with your Shopify theme development:
- Mark Dunkley's cheat sheet - Every template variable and liquid logic, filter and output tag you'll ever need.
- Shopify theme documentation - Recently redesigned and a great reference point for theme building
- Shopify ecommerce forums - Lots of topics covered ranging from setting up a store to theme building and hints and tips on running a successful online business
Next Steps
Shopify is a great and rewarding platform to design for with the added bonus that Liquid is becoming widely adopted in other tools like Mixture and SiteLeaf. We have covered a lot over these three tutorials. Above all I hope you have found it interesting and useful and that the ideas presented here enable you to build great ecommerce experiences for you and your clients.
