Over the years, I’ve developed some methods and tricks to improve my productivity and work consistency. This tutorial will cover how to embrace modular thinking in your workflow, when building flexible and lightweight UIs using Adobe Illustrator CS5 (or above) along with some free resources. Let’s get started.
1. Set Up a Flexible Foundation
Building the Grid
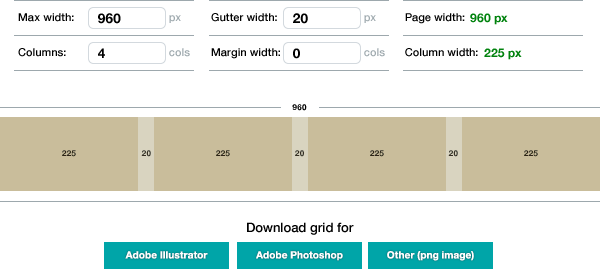
Gridcalculator.dk offers the options you’ll need to easily create a flexible grid. This can save you time on experimentation and calculations.
Managing the Grid
Grids should be separated from objects, so you can toggle their visibility independently and re-use them while designing multiple pages or screens.
Place your guides as the top layers of your document, above all your content.
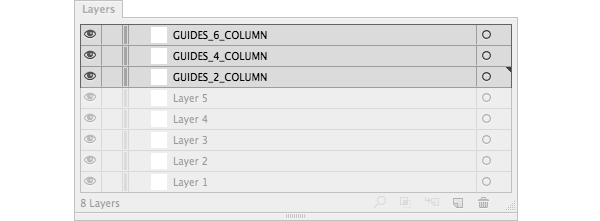
If your grid has multiple columns, it’s best to separate them into independent layers or it might get too crowded. Some pages might need four columns others might need only two. This allows you to manage grid’s visibility according to your needs.
Using Vector Browsers
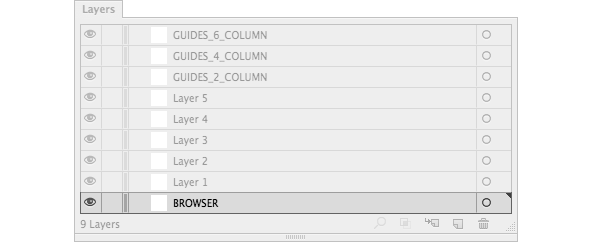
Using a fully scalable browser will be helpful to export high resolution images and to build responsive designs.
Position your browser(s) below all your content layers.
Note: In the attachments of this tutorial, you can download my responsive Illustrator setup which includes vector versions of both chrome desktop and safari mobile.
2. Optimize Your Workspace
Customizing Workspaces (Window > Workspace) to fit your personal or project needs is crucial to your workflow. I know which tools I use most frequently, so closing/opening panels, and moving windows around, is boring and unproductive. I currently work with three Workspaces depending on screen size:
- for my laptop, when I’m on the move.
- for my studio external display.
- for my home external display.
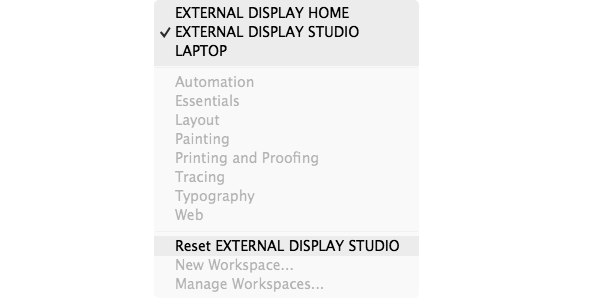
Using Workspaces is really neat: I can easily revert the interface to my default settings by clicking Reset (name of your Artboard).
3. Design with Pixel Precision
Pixel Alignment Options
When creating a new document, leave the Align New Objects to Pixel Grid unchecked. Yes, unchecked.
If you check that option, some UI elements, like outlined (expanded) text, will be distorted and you won’t be able to draw some shapes freely when your points are constantly snapping to the pixel grid.
You should choose which objects need to be pixel aligned by selecting the Align to Pixel Grid option from the Transform panel.
Note: Once you apply Align to Pixel Grid to an object, there’s no way to revert the selected object to the original ”unaligned” state. Unchecking that box won’t save you.
Enable Pixel Preview
When zooming your artwork above 100%, you can actually see the pixels as if you are working with a bitmap image. Activate it by going to View > Pixel Preview. This will let you spot which pixels might cause fuzzy edges so that you can fix them on the fly.
Note: The pixel grid is sensitive to the ruler origin (0,0). Moving the origin of the ruler will change how Illustrator “rasterizes” artwork. Also, make sure your object X and Y coordinates are rounded.
Do Simple Math
Illustrator has some basic mathematical functionality to adjust objects within panels and dialogs. This is useful when you want to add (+), subtract (-), divide (/) or multiply (*) values. These operations can be used in objects, strokes, transparency and in many other things.
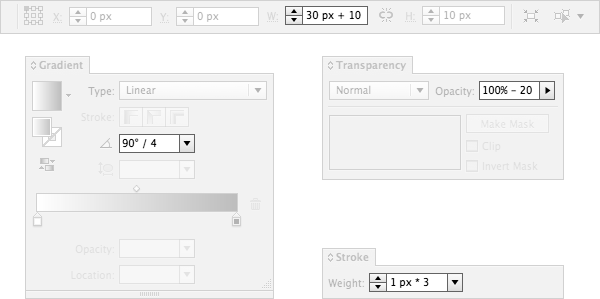
Unfortunately, you can only do an operation at a time. Something like “260/3*2” is not possible.
4. Work with Re-usable UI Objects
Use Symbols and Instances
Usually the same UI component is used over and over again, only changing its size and color. Think modular, plan ahead and build non-destructive components that can be easily recyclable. Avoid checking every screen to see whether you have forgotten to update one element. Symbols can be very powerful when well though out.
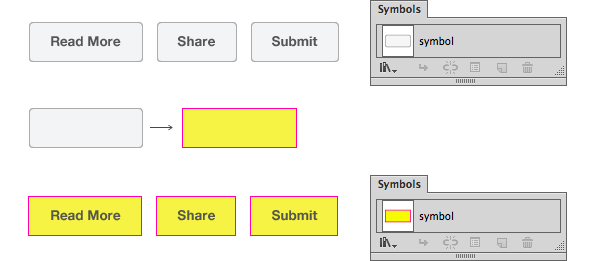
Whenever you change the original symbol, those changes get immediately reflected in all instances found in your document. This is especially useful for recurring regions, such as buttons, footers, pagination elements, navigation, backgrounds, etc.
You can even use symbols inside symbols (”combos”). This saves you time and ensures consistency throughout the UI.
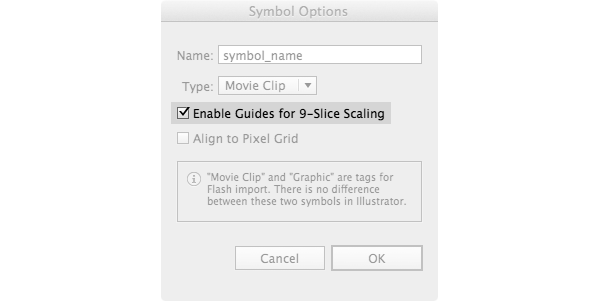
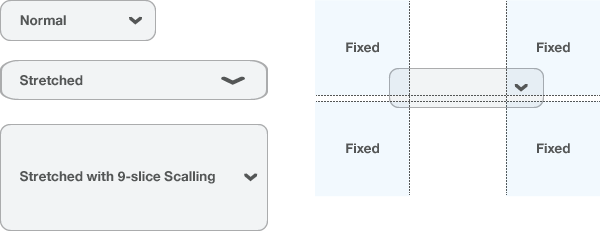
Non-Destructive Editing Using 9-Slice Scaling
The 9-Slice Scaling is an advanced symbol’s option that allows you to define which areas of a symbol will not stretch while changing its size.
If you change the width of a symbol without using this function, you will obtain deformed shapes. This can be specially helpful for buttons when you only need a segment of a symbol to be stretched.
Note: You can enable 9-scaling in a symbol at any time. But for better results, make sure to check the 9-scaling option when you are creating the symbol for the first time.
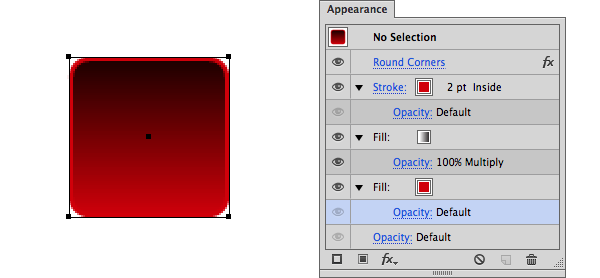
Non-Destructive Editing Using Appearance Attributes
Appearance attributes do not effect the underlying structure of an object or group of objects. It’s pretty useful to use effects like rounded corners or stacks of color fills that can be changed or removed at all times.
Dynamic Text Buttons
There’s a way to create buttons that adapt to your text length. This is how:
- Select your text box.
- In the Appearance panel add two new Fill layers.
- Position your Characters layer between the two Fill layers.
- Select the lower Fill layer.
- Go to Effect > Convert to Shape > Rectangle
- Customize the shape options padding.
- Done
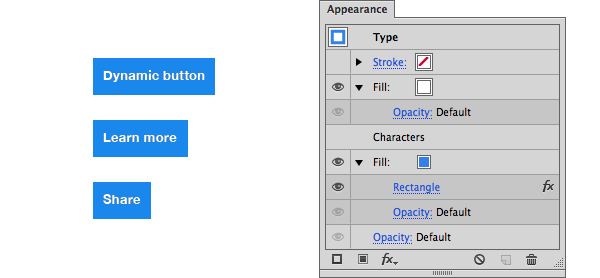
Play around with it. You can save that as a Graphic Style for future use.
Note: This is only recommended for wire-framing since pixel alignment is hard with this method.
5. Working with Color
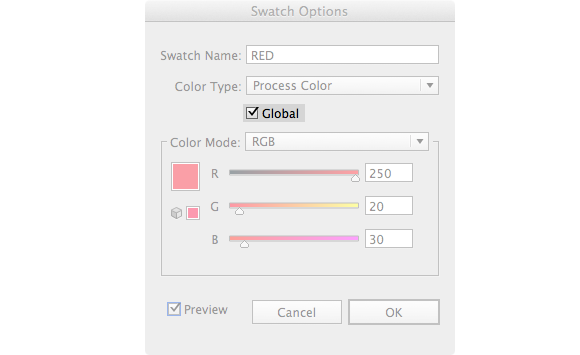
Global Colors
This is one of the most underrated features, but it's very powerful. Every time you modify a Global Color, all objects using that swatch are updated. You can instantly fine-tune dozens of objects.
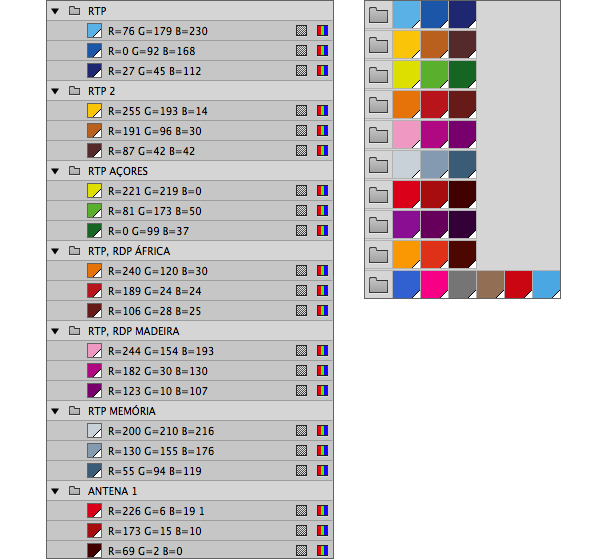
Color Groups and Palettes
Color Groups is a big time saver when working with huge color schemes or multiple brands at one time. Giving them clear names, makes it easy for people to search and work from the same file.
If you are willing to experiment, you can download palettes and color schemes from sources like Kuler and Colourlovers. Also, play around with the Recolor Artwork wheel to try different color themes: Edit > Edit Colors > Recolor Artwork.
6. Working with Text
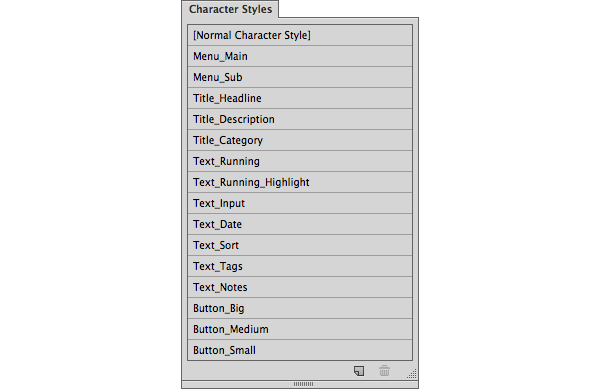
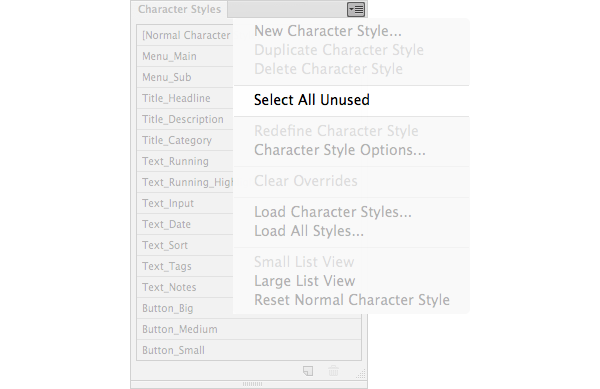
Use Character Styles Only
Character styles can be applied to any amount of text: from big chunks to single words. They are more flexible and trump paragraph styles. Since we are not doing print work, only use character styles to ensure that your typography is consistent.
You should order your Character Styles list by size: from bigger to smaller text, by layout order: from top to bottom, or alphabetically. This will help you maintaining a better hierarchy and easily search through your list.
Fine tune and reuse your styles as much as possible to avoid creating too many exceptions. This will simplify the development and enhance consistency.
Write Representative Dummy Text
Any text without context or relevance to the subject is worthless. Don’t abstract yourself from the real experience. “Lorem ipsum” gives you a shape, but it doesn't give you meaning. Writing your own copy for headlines or navigation helps explain their use and the valuable information they can give. If your site or application requires data input, enter real and relevant words. Type a real name or city.

When you use real text, you discover issues that might otherwise go unnoticed: columns are too wide/narrow, fields needed to be bigger/smaller, some things work in one language but don’t work on others, etc.
Using representative data is a good heads-up for what the final product is going to be.
7. Designing for Multiple Screens at Once
Responsive Design
With Illustrator you’re not limited to a specific resolution. In a single document, and using Artboards, you can simulate how an UI should respond to different screen resolutions and edit them simultaneously using Global Colors, Symbols and Character Styles. Even with dozen of different screens, the file will stay small and easy to manage.
1. Artboards as Device/Screen Sizes
Name each Artboard according to the device/screen size. This will automatically name those screens upon saving. I’ll share some saving and naming tips further in the tutorial.
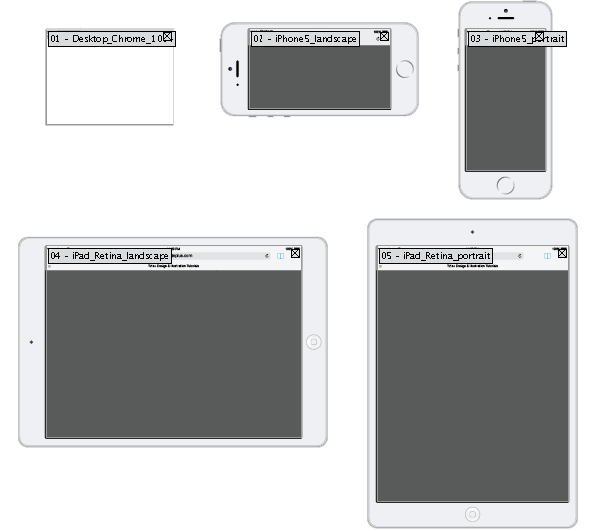
Note: In the attachments of this tutorial, you can download the responsive illustrator setup seen above.
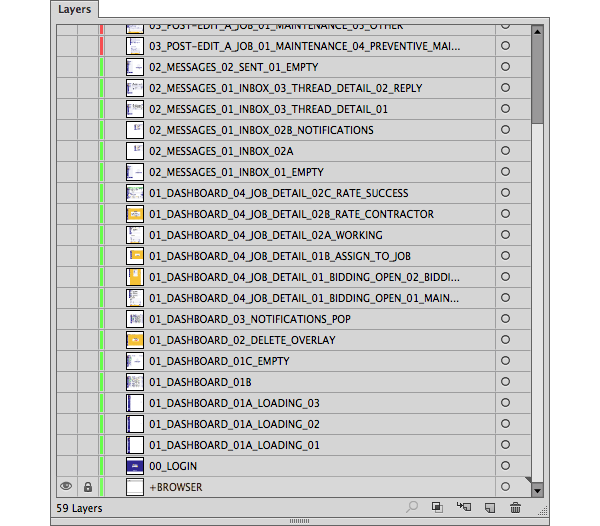
2. Layers Named as Pages:
This allows you to see how a single page looks in every screen size and export all layers (pages) from a select Artboard (screen size) independently.
8. Organize Your Files
Clean up is really important to keep your files in good shape and speed up performance. To achieve that, use Illustrator’s built-in options.
Clean up Using Actions
Windows > Actions > Delete Unused Panel Items
This
action will automatically go through each panel, select the contents
that are not in use, and then delete them in a matter of seconds.
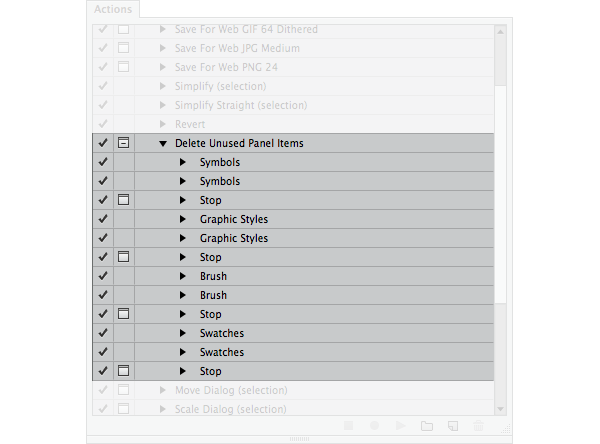
This default action doesn’t include cleaning up your unused character styles. You can add that step or you can manually Select All Unused, then trash them.
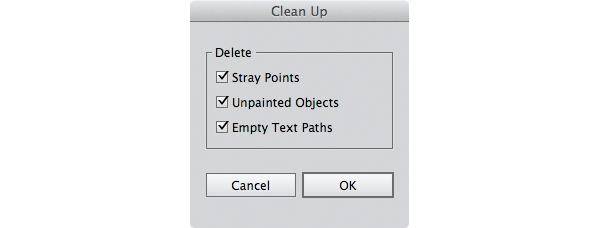
Clean up Using Clean Up Command
If you want to get rid of stray points, unpainted objects and empty text paths, this is how:
- Unlock all layers
- Make all layers visible
- Object > Unlock all (to make sure that we apply this method to all objects)
- Select all Objects in all layers
- Object > Path > Clean Up
- A dialog pops and select OK.
Layer Managing and Naming
When using layers, hide all groups or object in the Layers Panel Options. This is how it should look:
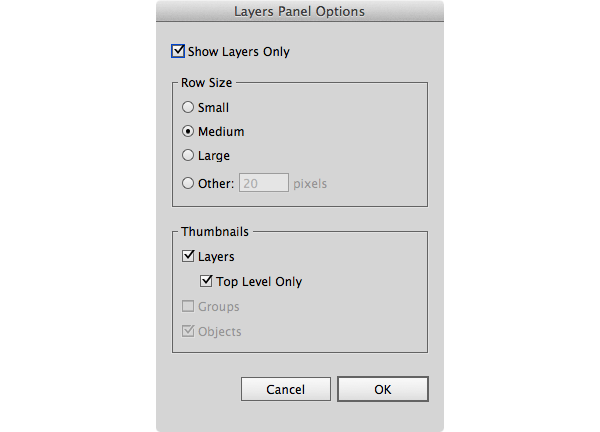
Name each layer with a page name. Give numbers to each layers’ name to keep them ordered when exported. Using caps and non-spacing names sometimes make them easy to read.
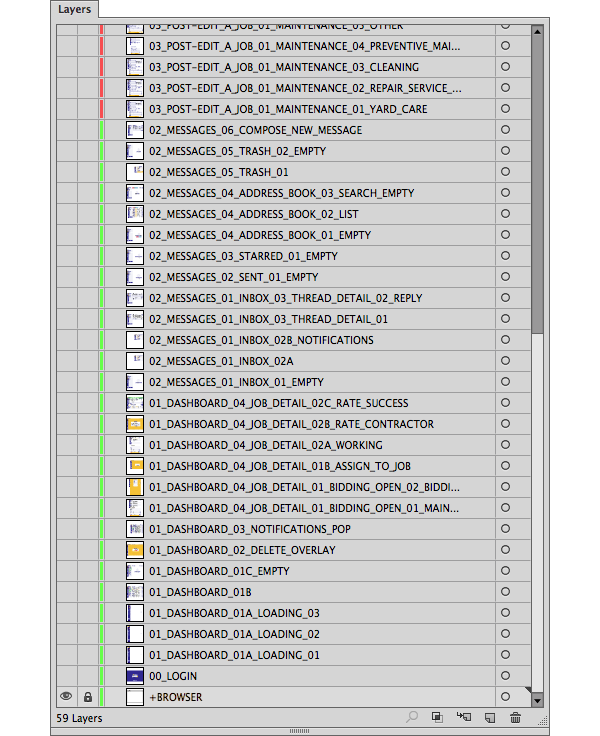
Those 59 layers/pages weight only 2.5mb (no images embedded), which allows high performance and very fast saving times.
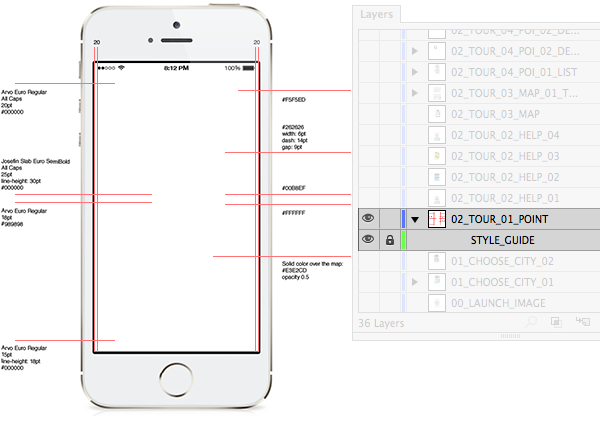
Layers with Style Guides
To include style guides for development in your files, you should create a “sub-layer” associated to each a page/layer. This is how you do it:
- Create new layer named
STYLE_GUIDE - Drag and drop that layer over your desired layer.
Those guides will stay on top of your content and since they are positioned in a “sub-layer”, you can easily manage their visibility.
Placing images
When placing bitmap images, don’t embed them in your file. Choose Link instead.

This will decrease your file-size, improve illustrator performance and gives the ability to edit those images separately. Illustrator automatically detects when a file is updated.
9. Saving and Exporting Options
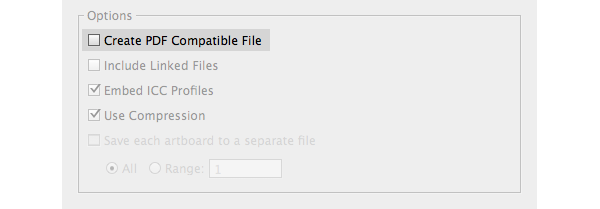
Avoid PDF compatibility
�If you follow all the steps above, your files should be lightweight. Although, if you check Create PDF Compatible File while saving, this will bloat your file size and raise the saving time. Since we’re only dealing with screen graphics with multiple layers and artboards, there’s no real advantage in leaving this checked.
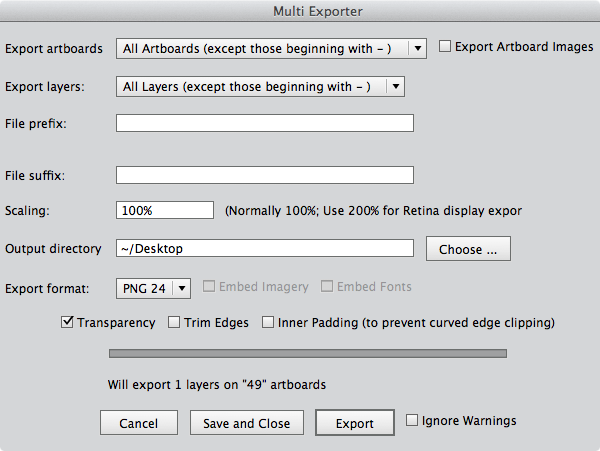
Export Multiple Layers and Artboards�
For better control of the exporting options, download this Multi Exporter script. Using it is pretty straightforward, but take a look at the documentation so you can take full advantage of it.
Manage and Export Mobile Assets�
Device size/resolution fragmentation makes exporting mobile assets require a lot of time. Well, scripts can also help with that. Download this Illustrator scripts for mobile design.
Mobile assets required specific file naming depending on the OS. To follow their naming conventions, it’s easier to create separated Illustrator files for each OS. If some assets are common to the platforms you are working on, create a file named “common” or whatever suits you.

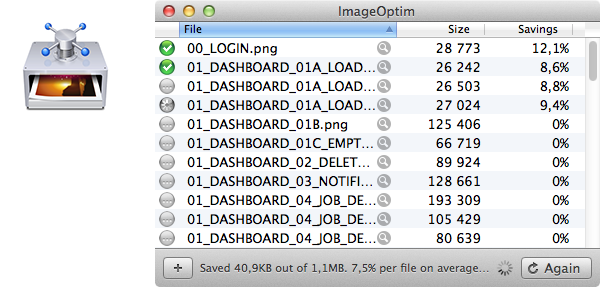
Optimizing the Output
In web and mobile environments, performance is key and every byte counts. Illustrator lacks PNG/JPG optimization so use ImageOptim (Mac OS X) after exporting your content.
Final Thoughts
We're heading towards a responsive and agile web, where our UIs need to be immune to pixel density and consistent across many different sizes. Infinite scalability is invaluable, and vectors are an important part of resolution independence.
Illustrator’s modular workflow stands up against scale and time and it’s a solid option from a productivity and flexibility standpoint. I’m sticking with it. What about you?
