Windows is hot again; not only because of its recent product unveilings, but also because of its striking direction in design language and interface.
You may already be familiar with the Start screen on Windows Phone, upon which it shows so-called Tiles.
“A Tile is an image that represents your app on the Start screen.” - msdn
These Tiles are akin to the icons in iOS or Android, except that they can be resized to show different states of the app, and they even show a glimpse of notification updates instead of just being static icons.

Here is an example from the official Poki app; a beautiful pocket client app for Windows.

Websites can adopt tiles in the same manner as they do Apple touch icons. When you bookmark (or pin) a website to the home screen in iOS, it will show the website icon if provided. Similarly, in Windows, users may bookmark a website to the Start screen. So, why not add tiles to your websites? Ultimately, one of our responsibilities as web developers is to optimize websites for users regardless of the platform they are using.
In this tutorial, we are going to see how to add tiles for websites.
Creating Icons
By default, when designated images for tiles are not provided Windows will grab the image from the favicon. However, since a favicon is typically set at very small size (usually 32px or 64px square) the image could end up blurry.
We’re going to design icons specific to the task, and we can do so with any graphic application that we choose (Photoshop, Sketch, MS Paint, etc.). There are actually a few tools that automate creation of icons for multiple platform (iOS, Android, Windows, and Chrome) all at once, such as this Grunt Favicon Task. Still, I prefer to have more control of how each icon is presented in each platform.
The only thing to care about, in this case, are the required image dimensions.In this case four different sizes:
- 70x70
- 150x150
- 310x150
- 310x310
as follows:

Save each of these icons with a transparent background (we will see why we don’t need the background shortly), giving them suitable names.
Meta
Now to reference them within the web page. If you have already optimized your website for iOS devices you will be familiar with the apple-touch-icon link tag. Similarly, Microsoft have introduced a set of new proprietary meta tags, named msapplication-*, as follows:
<meta name="msapplication-square70x70logo" content="images/tiles/acme-tile-small.png" /><meta name="msapplication-square150x150logo" content="images/tiles/acme-tile-medium.png" /><meta name="msapplication-wide310x150logo" content="images/tiles/acme-tile-wide.png" /><meta name="msapplication-square310x310logo" content="images/tiles/acme-tile-large.png" />
These meta tags will serve the icons when each size is most appropriate. Note that the msapplication-square310x310logo (the largest tile size) may only appear in devices with larger screens such as the Surface Pro or Lumia 1020. Phones such as Lumia 620 or 520 will likely not see the tile of this size.
Having sorted out our markup we should see our icons appear within a Windows tile when saved to the Start screen:
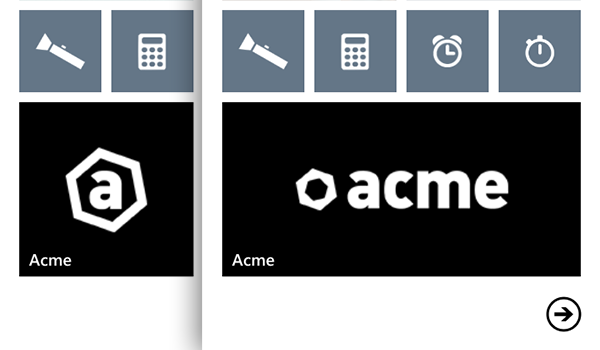
Default Behavior
As you can see above our icon is white and the tile color black, and we can also see the word “Acme” in the lower-left of the tile.
Windows has used the user’s theme color as the background of the tile, showing through all transparent areas. Windows also took our website title, “Acme”, as the tile name.
Neither of these are ideal however; the background colour may not work with our icon at all, and perhaps the webs page title is way too long for the space provided on the tile. So, in addition to providing the icons, we should also specify the tile color and the website name.
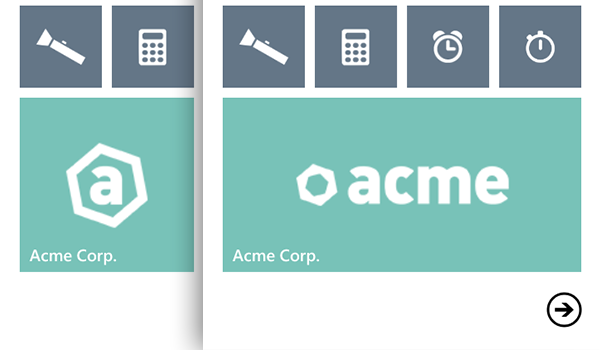
Tiles Color and Name
We specify the Tile color and name through msapplication-TileColor and application-name meta tags, as follows:
<meta name="msapplication-TileColor" content="#83d3c9" /><meta name="application-name" content="Acme Corp." />
Unfortunately we can only set the tile color in HEX format; very few color keywords are supported. I hope this can be improved in the next iteration, perhaps in the new browser (codename Spartan), with more supporting color formats like RGBA or HSLA to take advantage of transparent effects.
Within the second meta tag, we set the tile name to “Acme Corp.”, so Windows will take it for the tile name instead of the <title>. After re-pinning the website, we should now have the Tile with the new specified color and name.
Cleaning Up the Mess
Now we have added a list of meta tags within the page <head> to display our tiles in Windows. Along with them you may also have tags to display icons for favicon, iOS, Android, and Firefox, in which case your website <head> element is probably starting to look a real mess!
Happily, Microsoft have given us a way to concatenate these tiles tags into a single file in XML format.
Begin by creating a new file named tile.xml. Then, add the following XML formatted structure; the equivalent to the specification that we already set with our meta tags.
<?xml version="1.0" encoding="utf-8"?><browserconfig><msapplication><tile><square70x70logo src="images/tiles/acme-tile-small.png"/><square150x150logo src="images/tiles/acme-tile-medium.png"/><wide310x150logo src="images/tiles/acme-tile-wide.png"/><square310x310logo src="images/tiles/acme-tile-large.png"/><TileColor>#83d3c9</TileColor></tile></msapplication></browserconfig>
Now, remove the meta tags from the <head> (except the application-name), and replace them with the following msapplication-config pointing to the XML file:
<meta name="msapplication-config" content="tile.xml" />
This will give us the same result as shown in the previous screenshot, whilst keeping our document markup cleaner.
Conclusion
In this tutorial we added Windows tile support for our website, which will take charge of the tile presentation when users pin our website on Windows Start screens.
Remember: being web developers we need to ensure that users get an optimal experience regardless of the platform they are using.
Further Reading
- What Everybody Ought to Know About App Design for Windows 8
- Tile design guidelines for Windows Phone
- Microsoft Design Language
