During this tutorial I’m going to be introducing you to HTML5 audio and showing you how you can create your own player.
Introduction
Until now implementing audio into a web project has been a tedious process relying heavily on 3rd party plugins such as Flash. Since the iPhone’s notorious non acceptance of the plugin and the news that Adobe will no longer support Flash for mobile, many developers are looking at other ways to incorporate audio into their projects. This is where HTML5 audio steps in to solve the problem.
Although HTML5 provides a standard for playing audio files on the web, it is still in its infancy and still has quite a long way to go before it can provide everything that other plugins such as Flash audio provides. However, for most cases, it’s more than adequate.
Simple Html5 Audio
The simplest way to implement audio into a web page using HTML5 is to use the new audio tag. Add this to your HTML5 document with the following code:
<audio controls="controls">
  <source src="track.ogg" type="audio/ogg" />
  <source src="track.mp3" type="audio/mpeg" />
Your browser does not support the audio element.
</audio>
If you take a look at the code above you can see that I have declared the <audio> tag and defined the controls attribute, so that we see the default controls for the player.
Nested in the <audio> we have 2 ‘src’ tags. One defines an MP3 track and the other defines the OGG format. The OGG format is especially used to allow the music to play in Firefox as due to licensing issues Firefox doesn’t support MP3 without using a plugin. A string of text Your browser does not support the audio element. lets users with unsupporting browsers know what’s going on.
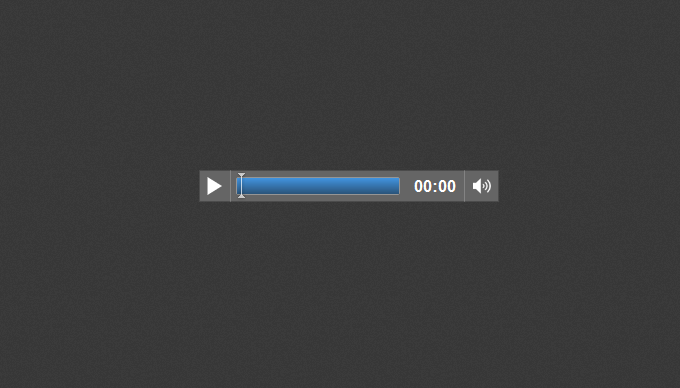
The default HTML5 audio player
Html5 Audio Tag Attributes
As well as supporting global HTML5 attributes the tag also supports a set of attributes unique to itself.
- autoplay – This can be set to “true” or left blank “” to define whether the track should automatically play as soon as the page is loaded.
- controls – As seen in the example above, this defines whether the native controls such as ‘play,pause’ etc should be shown.
- loop – This can be set to “loop” and defines whether the track should play again once it has finished.
- preload – This can be set to “auto” (which describes whether the file should load as soon as the page loads), “metadata” (which describes whether only the metadata, track title etc. should be loaded), “none” (which dictates that the browser should not load the file when the page loads).
- src – This can also be seen in the example above and defines the url of the music that should be played by the audio tag.
Cranking it up to Eleven
In the last few steps we’ve looked at the simplest form of HTML5 audio. When we start to utilize the audio tag with javascript we can start to create some really interesting and useful audio players. Let’s take a look at what jQuery can do for us. After we’ve defined document ready in jQuery, we can create a new audio variable to hold our audio file as simple as this:
var myaudio = new Audio('mysong.mp3');
It really is that simple! Then whenever we want to perform an action on the audio we can trigger it by using the variable ‘myaudio’. Here’s a list of actions that we can take with the variable. Make a note of these, we’ll be using some of them later on in the tut when we create our audio player..
myaudio.play(); - This will play the music.
myaudio.pause(); - This will stop the music.
myaudio.duration; - Returns the length of the music track.
myaudio.currentTime = 0; - This will rewind the audio to the beginning.
myaudio.loop = true; - This will make the audio track loop.
myaudio.muted = true; - This will mute the track
If you want a function to be called once the audio has finished playing then you can use ‘myaudio.addEventListener(‘ended’,myfunc)’ – This will call ‘myfunc()’ once the audio has finished.
Creating the HTML5 Audio Player: Markup
Now that you have a bit of background on HTML5 audio and understand the basic principles it’s time to put these into practise and create a customised HTML5 audio player. I’ll miss out the design stage as it’s outside the scope of this tutorial, but you can download the accompanying source code and browse through the PSD to get some idea as to how it’s put together.
The top of the document is made up of the HTML5 doctype. Yahoos CSS Reset, the Google web font ‘Lobster’ for the title. Then we have the latest jQuery and the custom JavaScript file js.js. Fnally we have html5slider.js which allows Firefox to display the HTML5 input range type, which we will use for the audio scrubber.
<!DOCTYPE html>
<head>
	<title>HTML5 Audio Tutorial</title>
	<link rel="stylesheet" type="text/css" href="http://yui.yahooapis.com/3.3.0/build/cssreset/reset-min.css">
	<link href='http://fonts.googleapis.com/css?family=Lobster' rel='stylesheet' type='text/css'>
	<link rel="stylesheet" type="text/css" href="css/style.css">
	<script src="http://code.jQuery.com/jQuery-latest.js" type="text/javascript"></script>
	<script type="text/javascript" src="js/js.js"></script>
	<script type="text/javascript" src="js/html5slider.js"></script>
</head>
After the h1 title I’ve created a div with a class of “container” and “gradient”. I’ve created a separate class of gradient as this will be reused on some other elements. Within “.container” I’ve added an image (which will be the album cover), then the three anchor tags will act as the controls for the player. Between them you’ll find the scrubber/HTML5 range input field.
<body>

	<h1>HTML 5 Audio Player</h1>

	<div class="container gradient">

		<img class="cover" src="images/cover.jpg" alt="">

		<div class="player gradient">

			<a class="button gradient" id="play" href="" title=""></a>
			<a class="button gradient" id="mute" href="" title=""></a>

				<input type="range" id="seek" value="0" max=""/>

			<a class="button gradient" id="close" href="" title=""></a>

		</div><!-- / player -->

	</div><!-- / Container-->
</body>
</html>
Creating the HTML5 Audio Player: Styles
Rather than go through every aspect of the CSS, I’m going to give you an overview and note any particular parts that you might want to pay attention to.
In the code below I’ve created the gradient for the player which has been generated using this CSS gradient editor. I’ve then created the player “.container” with some CSS3 transitions.
You’ll notice I’ve also used the CSS3 box sizing attribute set to ‘border-box’. This allows for the 10px padding around the container to be included within the width that I’ve declared, in this case 427px. If I hadn’t used this the padding would be added to the 427px making the container larger than I actually want it. It’s becoming common practice these days to apply * {box-sizing: border-box;} which actually makes for a more intuitive way of styling.
I’ve also added some CSS3 transitions to “.coverlarge” to allow for some nice transitions when the player first opens. The CSS may look a little overwhelming at first, but a lot of it is specific browser prefixes to ensure that the audio player looks and works the same across different browsers.
.gradient {
	border: 1px solid black;

	-webkit-box-shadow: inset 0 1px 0px rgba(255,255,255,.2);
	-moz-box-shadow: inset 0 1px 0px rgba(255,255,255,.2);
	box-shadow: inset 0 1px 0px rgba(255,255,255,.2);
	background: #494949; /* Old browsers */
background: -webkit-linear-gradient(top, #494949 0%, #434242 31%, #393838 55%, #242323 83%, #1b1a1a 100%, #161515 100%, #0b0b0b 100%);

	background: -moz-linear-gradient(top, #494949 0%, #434242 31%, #393838 55%, #242323 83%, #1b1a1a 100%, #161515 100%, #0b0b0b 100%);
	background: -o-linear-gradient(top, #494949 0%, #434242 31%, #393838 55%, #242323 83%, #1b1a1a 100%, #161515 100%, #0b0b0b 100%);
	background: -ms-linear-gradient(top, #494949 0%, #434242 31%, #393838 55%, #242323 83%, #1b1a1a 100%, #161515 100%, #0b0b0b 100%);
	background: linear-gradient(top, #494949 0%, #434242 31%, #393838 55%, #242323 83%, #1b1a1a 100%, #161515 100%, #0b0b0b 100%); /* W3C */
-image  filter: progid:DXImageTransform.Microsoft.gradient( startColorstr='#494949', endColorstr='#0b0b0b',GradientType=0 ); /* IE6-9 */
}

.container {
	-webkit-transition: all .7s ease;
	-moz-transition: all .7s ease;
	-o-transition: all .7s ease;
	-ms-transition: all .7s ease;
	transition: all .7s ease;
	position: absolute;
	width: 427px;
	height: 70px;

	-webkit-border-radius: 10px;
	-moz-border-radius: 10px;
	border-radius: 10px;

	-webkit-box-shadow: 0px 0px 13px rgba(0,0,0,.3),inset 0 1px 0px rgba(255,255,255,.2);
	-moz-box-shadow: 0px 0px 13px rgba(0,0,0,.3),inset 0 1px 0px rgba(255,255,255,.2);
	box-shadow: 0px 0px 13px rgba(0,0,0,.3),inset 0 1px 0px rgba(255,255,255,.2);
	top: 50%;
	left: 50%;
	margin: -214px 0px 0px -214px;
	padding: 10px;

	-webkit-box-sizing: border-box;
	-moz-box-sizing: border-box;
	-ms-box-sizing: border-box;
	box-sizing: border-box;
}

.containerLarge {
	height: 427px;
}

.cover {
	-ms-filter: "progid:DXImageTransform.Microsoft.Alpha(Opacity=0)";
	filter: alpha(opacity=0);
	opacity: 0;
	width: 398px;
	height: 10px;
	border: 2px solid black;

	-webkit-border-radius: 5px;
	-moz-border-radius: 5px;
	border-radius: 5px;

	-webkit-box-shadow: inset 0px 5px 5px rgba(0,0,0,1);
	-moz-box-shadow: inset 0px 5px 5px rgba(0,0,0,1);
	box-shadow: inset 0px 5px 5px rgba(0,0,0,1);
}

.coverLarge {
	-ms-filter: "progid:DXImageTransform.Microsoft.Alpha(Opacity=100)";
	filter: alpha(opacity=100);
	opacity: 1;
	height: 398px;

	-webkit-transition: opacity .7s ease;
	-moz-transition: opacity .7s ease;
	-o-transition: opacity .7s ease;
	-ms-transition: opacity .7s ease;
	transition: opacity .7s ease;

	-webkit-transition-delay: .5s;
	-moz-transition-delay: .5s;
	-o-transition-delay: .5s;
	-ms-transition-delay: .5s;
	transition-delay: .5s;
}
How the audio player should look at this stage
Once the container for the player is complete, it’s time to create the actual controls. The majority of the buttons have been created using CSS sprites
Unfortunately IE doesnt yet support the HTML5 range input so I’ve decided not to show the audio scrubber to IE users. If you are in a position where that isn’t acceptable, you can use the jQuery UI slider in a similar way to the method I’ve used. Still, I’ve opted to simply hide the scrubber, hence input{display:none\9!important;} This basically hides the input from ie users (check out this thread on Stack Overflow for more info on the \9).
The problem with the HTML5 range slider is that only a few browsers support custom styling for it; mainly webkit browsers (Chrome and Safari). Opera and Firefox will only show a standard range slider, unfortunately. If you do need custom styling across all browsers then you can use the jQuery UI slider as mentioned earlier. You can see the custom styling for webkit browsers in the input::-webkit-slider-thumb attribute.
.player {
	-webkit-box-sizing: border-box;
	-moz-box-sizing: border-box;
	-ms-box-sizing: border-box;
	box-sizing: border-box;
	position: absolute;
	width: 300px;
	bottom: 10px;
	width: 95%;

	-webkit-border-radius: 3px;
	-moz-border-radius: 3px;
	border-radius: 3px;
	padding: 5px;
}

.button {
	display: block;
	width: 34px;
	height: 34px;
	background-image: url(../images/sprite.png);
	background-repeat: no-repeat;
	float: left;
	margin-right: 5px;
}

#play {
	background-position: 6px 5px;
}

#pause {
	background-position: -32px 5px;
}

#mute {
	background-position: -63px 5px;
}

#muted {
	background-position: -106px 5px;
}

input[type="range"] {
	width: 250px;
	margin-top: -5px;
}

#close {
	float: right;
	background-position: -146px 5px;
	display: none;
}

.volume {
	position: absolute;
	height: 100px;
	width: 34px;
	border: 1px solid black;
	background-color: #242323;
	top: -97px;
	display: none;
}
input{
	display:none\9!important;
}
input[type="range"] {
	-webkit-appearance: none;
	border: 1px solid black;
	position: absolute;
	top: 18px;
	display: block;
	width: 63%;
	height: 15px;

	-webkit-border-radius: 20px;
	-moz-border-radius: 20px;
	border-radius: 20px;
	background-color: #242323;
	left: 90px;

	-webkit-box-shadow: inset 0px 4px 4px rgba(0,0,0,.6);
	-moz-box-shadow: inset 0px 4px 4px rgba(0,0,0,.6);
	box-shadow: inset 0px 4px 4px rgba(0,0,0,.6);
}

input::-webkit-slider-thumb {
	-webkit-appearance: none;
	width: 20px;
	height: 20px;
	border:1px solid black;

	-webkit-border-radius: 10px;
	border-radius: 10px;
	background: #80e4df; /* Old browsers */
background: -webkit-linear-gradient(top, #80e4df 0%, #75dbd6 13%, #5ec4bf 33%, #57bbb6 47%, #419d99 80%, #378f8b 100%);

	background: -moz-linear-gradient(top, #80e4df 0%, #75dbd6 13%, #5ec4bf 33%, #57bbb6 47%, #419d99 80%, #378f8b 100%);
	background: -o-linear-gradient(top, #80e4df 0%, #75dbd6 13%, #5ec4bf 33%, #57bbb6 47%, #419d99 80%, #378f8b 100%);
	background: linear-gradient(top, #80e4df 0%, #75dbd6 13%, #5ec4bf 33%, #57bbb6 47%, #419d99 80%, #378f8b 100%); /* W3C */
}
Creating the HTML5 Audio Player: jQuery
Once the styling and markup has been done it’s time to make the player actually come to life. We can do this using the javascript framework jQuery. Once the jQuery document ready has been declared, we create some variables within which we can store our jQuery objects.
container = $('.container');
	cover = $('.cover');
	play = $('#play');
	pause = $('#pause');
	mute = $('#mute');
	muted = $('#muted');
	close = $('#close');
	song = new Audio('music/track1.ogg','music/track1.mp3');
	duration = song.duration;
In the “song” variable above you can see that we’ve declared two tracks. The OGG format for Firefox and MP3 for other browsers. I then create a conditional IF statement so that we can check whether the browser can play MP3s or not. If it can, then we make the “song” variable source the MP3 track – if not then it will play the ‘OGG’ format.
if (song.canPlayType('audio/mpeg;')) {
  	song.type= 'audio/mpeg';
  	song.src= 'music/track1.mp3';
	} else {
  	song.type= 'audio/ogg';
  	song.src= 'music/track1.ogg';
	}
The next things we’re going to create are click functions which will allow us to play and pause the music. I use the audio action play() to start the audio, then use the jQuery method replaceWith which basically replaces the play button with the pause button.
I’ve also added the “coverLarge” and “containerLarge” classes to “container” and “cover”. As I’ve added CSS3 transitions to these earlier in the CSS this will add a nice transition when the audio starts to play. The “pause” function works in a similar way, but without the transitions. When clicked, it replaces the pause button with the “play” button.
play.live('click', function(e) {
		e.preventDefault();
		song.play();

		$(this).replaceWith('<a class="button gradient" id="pause" href="" title=""></a>');
		container.addClass('containerLarge');
		cover.addClass('coverLarge');
		$('#close').fadeIn(300);
		$('#seek').attr('max',song.duration);
	});

	pause.live('click', function(e) {
		e.preventDefault();
		song.pause();
		$(this).replaceWith('<a class="button gradient" id="play" href="" title=""></a>');

	});
The mute and muted buttons work similarly to the play and pause buttons, but call the related actions and replace the buttons with the appropriate alternatives.
mute.live('click', function(e) {
		e.preventDefault();
		song.volume = 0;
		$(this).replaceWith('<a class="button gradient" id="muted" href="" title=""></a>');

	});

	muted.live('click', function(e) {
		e.preventDefault();
		song.volume = 1;
		$(this).replaceWith('<a class="button gradient" id="mute" href="" title=""></a>');

	});
When the user clicks the “close” button we call jQuery to remove the “containerLarge” and “coverLarge” classes. This will hide the cover and close the player back up. We then pause the player by calling the pause() action and reset the audio currentTime to equal 0. This sets the track back to the beginning.
$('#close').click(function(e) {
		e.preventDefault();
		container.removeClass('containerLarge');
		cover.removeClass('coverLarge');
		song.pause();
		song.currentTime = 0;
		$('#pause').replaceWith('<a class="button gradient" id="play" href="" title=""></a>');
		$('#close').fadeOut(300);
	});
It’s now time to move onto the audio scrubber which has been given an id of “seek”. The first function is to allow us to move the scrubber to any part of the audio. This is done by detecting a change whenever someone moves the scrubber. We then set the song.currentTime to match the part of the song that the scrubber has moved to. We also set the max attribute to reflect the song duration.
$("#seek").bind("change", function() {
		song.currentTime = $(this).val();
		$("#seek").attr("max", song.duration);
	});
The final part of the jQuery is to make the “#seek” scrubber move along with the duration of the audio. We do this by adding an event listener to it and when the audio time updates we call the function. I set a variable of “curtime” to get the current songtime. I then update the value of the scrubber to reflect the current time position of the audio.
song.addEventListener('timeupdate',function (){
	curtime = parseInt(song.currentTime, 10);
		$("#seek").attr("value", curtime);
	});
And there you have it! An HTML5 audio player that you can implement on your site or app.
Conclusion
As mentioned earlier, HTML5 audio is still in its infancy and still has room for improvements. At the moment the audio is designed for playing music and will therefore always stream audio from the server which results in some browsers having issues with playback. It’s not always a problem, but just means that sometimes it will start paying before the audio has fully downloaded.
This can potentially be an issue if you want to use HTML5 audio for such things as sound effects in games, or audio intensive apps. For this reason our friends at Google have come up with a method to improve the audio tag’s weaknesses. Google have built and put forward a proposal to the W3C for the “Web Audio API”. This proves to be a lot more powerful than native HTML5 audio, however the problem is that at this stage (can you guess?!) it only works in Chrome.
You can read more about Google’s Web Audio API and see some examples at Google code or check out the web audio specification.
I hope you’ve enjoyed learning about HTML5 audio and how you can create your own players. My player includes basic controls, but there’s nothing to stop you adding more features such as volume control and even adding your own custom animations. With a little bit of thought and experimentation you really can create some great audio players. Download the source code and I’ll look forward to seeing what you come up with!